Note: Any configuration changes with DataFusion requires the PC to be restarted. Do not forget this.
Requirements:
- DataFusion must run on the same PC as Miltrac (otherwise TracInf DLL cannot work).
- Siemens BoxPC 627B or later with Windows XP or Windows 7. Older PCs with Windows 2000 must be upgraded. The PC must be set up using the latest Siemens setup disk.
- PC Miltrac version 21003 or later. DataFusion only works with expanded protocol Miltrac.
- Mentor version 21800 or later.
The DataFusion Interface communicates to the rail system through a web service. This web service emulates a Miltrac device to allow us to send commands and receive states from the rail. These occur at specific drop and pick up points in the rail system.
Note:
There is no install file because Windows does not allow automated installation of web services. This installation is done at the Milnor factory before shipment.
DataFusion troubleshooting
- Three programs need to be running for DataFusion to work:
- PC Miltrac™
- Milnor DataFusion Interface
- Miltrac Communicator
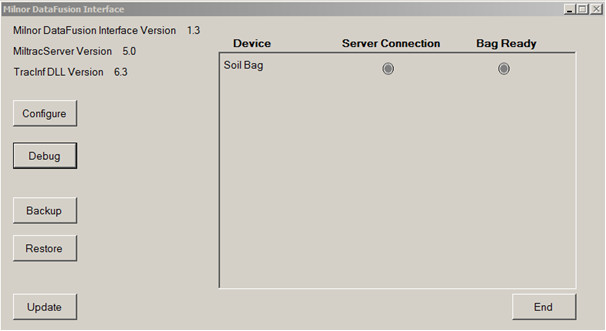
- Verify the "Server Connection" and "Bag Ready" lights are lit where expected (see below). The server connection light being on indicates that DataFusion is looking at the correct web server URL and can send data. The bag ready light being on indicates that DataFusion is receiving data from the rail system indicating that a bag is in position.
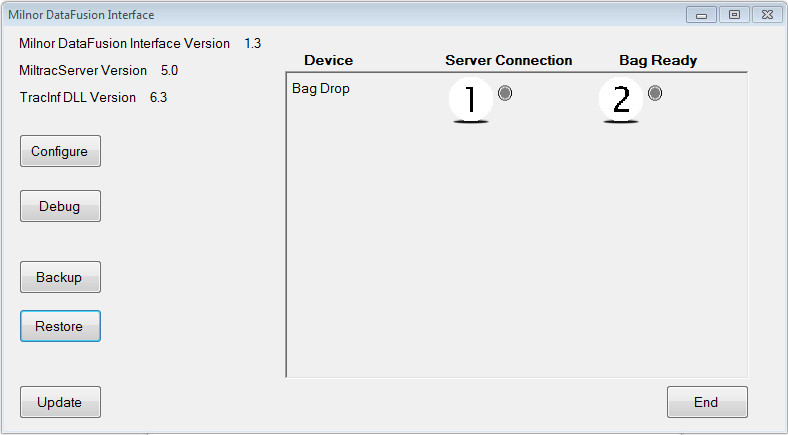
- If either of these lights is not lit, the Milnor system will not attempt to transfer with the rail system.
- Open the DataFusion software and find Debug. Once you open it you can view the message log. Look for sent and received messages.
- Sent items are signals that Milnor (Miltrac) sent to the rail system
- "Receive" is the information sent from the rail system to Milnor.
- If you see received messages and no sent messages then the issue is on Milnor's side and usually Mildata is not responding. Reloading Mildata will usually solve that issue, if you don’t see received information then it is a rail system issue.
On the rail system side:
A web server URL is created to send and receive data for each drop point. It also sets its target to the Multitrac IP address to send the data to. If the address set within the rail system does not match the Multitrac IP address, then Datafusion will not receive data. If we are not receiving data on the Debug page, then there is likely an issue with target IP address set within the rail system or the Multitrac PC IP address has changed from what it is supposed to be.
On the Datafusion side:
We configure the web server URL to match the one created by the rail system for each drop point. If this URL is set incorrectly, we will not be able to send data to the rail system. If we are not sending data on the Debug page, then it is likely that the web server URL is either set incorrectly in Datafusion, the rail system server is offline, or IP addresses have changed from what they are supposed to be.
Having static IP addresses set correctly is very important for these systems to communicate properly.
Signals are the same as if you were connected via allied inputs and outputs.
Sent (outputs)
- Request a bag
- Drop bag
- Received load
Received (inputs)
- Bag ready
- Cake data
Each rail system has different things to look for but still very similar
Other things I look for is network connection between Milnor and the rail system, go to Command Prompt in the Start Menu and type in ping then ping their PC to ensure network connection.
Ex. "Ping 192.168.0.21"
Finding network address
Go into DataFusion configure page, this is where each device on the rail system is configured. Here you will find the network address of the rail systems server.
Configuring DataFusion Rail Interface
DataFusion communicates to the rail system through a web service installed on the Multitrac PC. This web service makes the rail drop and pick up points look like Miltrac devices.
Installing:
DataFusion comes pre-installed on all Multitrac and Mentor PCs.
Configuring:
- Configuring DataFusion
- Open the DataFusion folder on the Desktop.
- Double click on MilnorDF (Milnor DataFusion interface).
- Click on Configure.
- Enter the password to change configuration and click Ok.
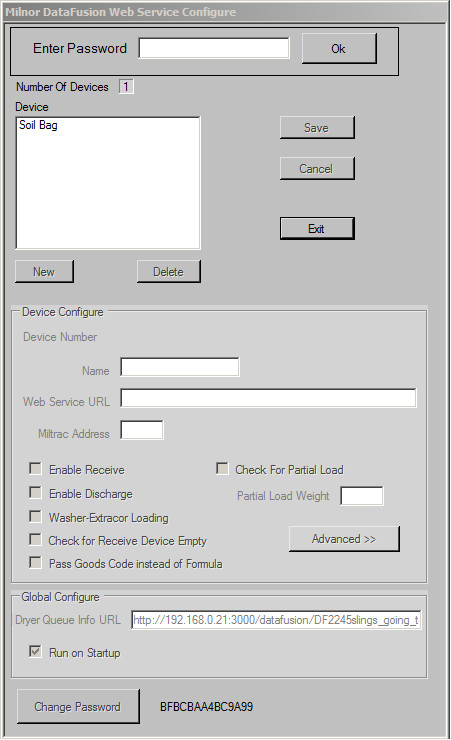
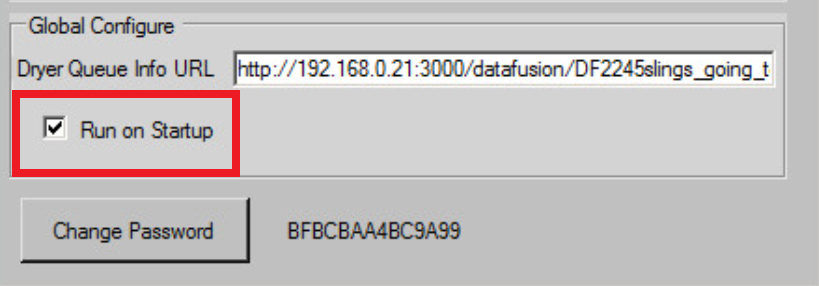
NOTE: during bootup, if the Milnor Delay program is installed on your PC (a window pops up that looks like command prompt and counts down), you need to make sure that Run on Startup is NOT checked. See below for where to find this option in Configure and uncheck it.
- For each drop point and pick up point, do the following:
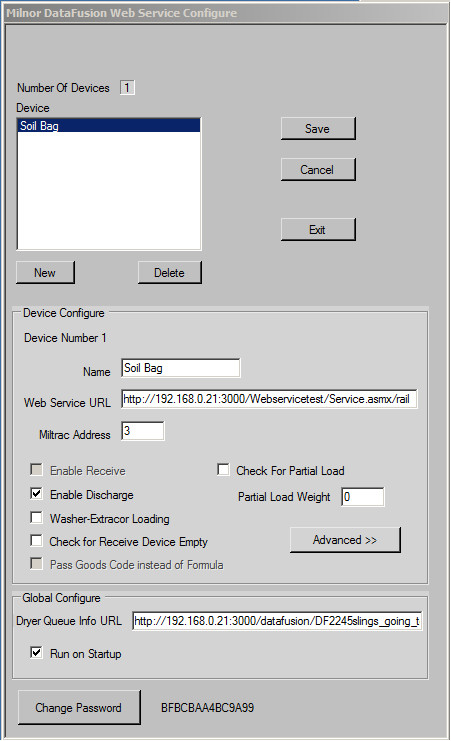
- Click on “New”
- Enter a name for this bag station
- Enter the Web Service URL for this station. This is the URL on the rail system computer that will handle communications for this station. For example, http://192.168.0.21:3000/tunnelcommunications/1.xml
- Enter a Miltrac address for this station. This address must match what is configured in Miltrac.
- If this station will be loading a Milnor device, check “Enable Discharge”. If this station will be receiving from a Milnor device, check “Enable Receive”. If this station will drop more than 1 bag per load to a washer-extractor, check “Washer-Extractor Loading”.
- Do not change any of the setting under “Advanced” without checking with Milnor Engineering.
- Click “Save” after configuring the rail point.
- Repeat from step 1 for each rail point.
- Make sure “Run on Startup” is checked.
- Click “Exit” when done.
- Configuring Miltrac
- Add a device in Miltrac for each bag station
- Configure each device. Enter X and Y coordinates like you would for any Miltrac device.
- Under Serial Com Port, select “TracInf.DLL”
- Find the *.xml files paths from your rail company; they will set the IP addresses for the rail server and communications.
Typical Rail Configurations
CBW Loading
- Enable Discharge, because this device is discharging to load the tunnel.
Clean Side Bag Loading
- Enable Receive, because this device is receiving a load from the tunnel system.
- If you are using Goods Codes, in the Milnor System, instead of Formula Codes, enable Pass Goods Codes instead of Formula.
Dryer Pod Loading
- Enable Discharge, because this device is discharging to the Dryer Pod System.
- Check for Receive Device Empty, we need to make sure the belt is clear.
- Check for Partial Load, we need to know whether it is a full or partial load.
- Adjust the Partial Load Weight according to the dryer size.
- Dryer pod systems need to have the PostWash.dat file configured in Mentor. See Datafusion data error on Drycodes for more details.
Washer-Extractor Loading
- Enable Discharge
- Washer-Extractor Loading
