CBW Drive System and Limit Switch Errors
The tunnel has four proximity-type limit switches to monitor rotation of the cylinder. Each of these limit switches provides a standard input to the Mentor controller, as described in Table 1 below. Select the Inputs and Outputs menu from the Mentor operational display to view the status of these switches.
Table 1: Limit Switch Identification
| Common Name | Input Number | Schematic Identification |
|---|
| Safety limit switch | 0 7 | SAFETY |
|---|
| Top dead center limit switch | 0 8 | TDC |
|---|
| Clockwise limit switch | 0 9 | CWLS |
|---|
| Counter-clockwise limit switch | 1 0 | CCWLS |
|---|
Note 1: Clockwise and counter-clockwise directions are identified by viewing the tunnel from the loading end, looking toward the discharge end.
1. Interpretation of Error Codes
The Mentor controller tracks the sequence of the limit switches and monitors the time between the actuation of two adjacent switches. If the controller detects a switch out of sequence, it stops the tunnel, sounds the operator signal, and displays a “Limit Switch” error. Because limit switch errors usually indicate that a switch was seen out of sequence, begin troubleshooting by looking for a failure in the limit switch wiring, then look for a failed limit switch.
If any limit switch fails to actuate within the specified time, it stops the tunnel, sounds the operator signal, and displays a “Drive System” error.
Either message is displayed with a four-digit code describing the tunnel status when the error occurred. The first character of the code represents the status of four tunnel conditions: temperature achieved, OK to transfer goods, level achieved, and load conveyor in motion. Use Table 2 to interpret this code. The second character of the code (see Table 3) represents the status of the four limit switches, identified in Table 1. The final two characters together represent the mechanical status of the machine, including motor direction and the most recent limit switch detected before the error, as described in Table 4.
Table 2: Tunnel Status Codes
| Code | Temperature
Satisfied | Transfer
Allowed | Level
Achieved | Load
Conveyor
Moving |
|---|
| 0 | No | No | No | No |
|---|
| 1 | No | Yes | No | No |
|---|
| 2 | No | No | Yes | No |
|---|
| 3 | No | Yes | Yes | No |
|---|
| 4 | Yes | No | No | No |
|---|
| 5 | Yes | Yes | No | No |
|---|
| 6 | Yes | No | Yes | No |
|---|
| 7 | Yes | Yes | Yes | No |
|---|
| 8 | No | No | No | Yes |
|---|
| 9 | No | Yes | No | Yes |
|---|
| A | No | No | Yes | Yes |
|---|
| B | Yes | No | No | Yes |
|---|
| C | No | Yes | Yes | Yes |
|---|
| D | Yes | Yes | No | Yes |
|---|
| E | Yes | No | Yes | Yes |
|---|
| F | Yes | Yes | Yes | Yes |
|---|
Table 3: Limit Switch Codes
| Code | Valid
Condition | Description |
|---|
| 0 | Yes | No proximity switches were energized or sensed a target. |
|---|
| 1 | Yes | Only the SAFETY switch was energized. |
|---|
| 2 | Yes | Only the top dead center (TDC) switch was energized. |
|---|
| 3 | No | The SAFETY and the TDC switches were energized simultaneously. No other switches were energized. |
|---|
| 4 | Yes | Only the clockwise (CWLS) switch was energized. |
|---|
| 5 | No | The CWLS and SAFETY switches were energized simultaneously. No other switches were energized. |
|---|
| 6 | No | The CWLS and SAFETY switches were energized simultaneously. No other switches were energized. |
|---|
| 7 | No | The CWLS, TDC, and SAFETY switches were energized simultaneously. The CCWLS switch was not energized. |
|---|
| 8 | Yes | Only the CCWLS switch was energized. |
|---|
| 9 | No | The CCWLS and SAFETY switches were energized simultaneously. No other switches were energized. |
|---|
| A | No | The CCWLS and TDC switches were energized simultaneously. |
|---|
| B | No | The CCWLS, TDC, and SAFETY switches were energized simultaneously. |
|---|
| C | No | The CCWLS and CWLS switches were energized simultaneously. No other switches were energized. |
|---|
| D | No | The CCWLS, CWLS, and SAFETY switches were energized simultaneously. The TDC switch was not energized. |
|---|
| E | No | The CCWLS, CWLS, and TDC switches were energized simultaneously. The SAFETY switch was not energized. |
|---|
| F | No | All four switches were energized simultaneously. |
|---|
| | A condition is not if two or more switches are energized at the same time. |
|---|
Use the information in Table 3 and Table 4 to determine which limit switch was seen last and which should have been seen next. With this information, you can determine which switch was seen out of sequence or was not seen within the specified time.
Table 4: Machine Status Codes
| Code | Description |
|---|
| Reversals Sequence |
|---|
| 0 0 | all motors driving baskets clockwise, having just passed switch CCWLS |
|---|
| 0 1 | all motors continuing to drive baskets clockwise, having just passed switch TDC |
|---|
| 0 2 | all motors continuing to drive baskets clockwise, having just passed SAFETY |
|---|
| During 02, the controller decides whether to continue reversals, at which time it goes to code 03, or to commit to transfer, where it goes to code 0C. |
| 0 3 | all motors off, baskets coasting clockwise having just passed switch CWLS |
|---|
| 0 4 | all motors remain off for a period controlled by COAST timer; baskets coast clockwise |
|---|
| 0 5 | half of motors drive baskets counter-clockwise; other half on after delay in HALFM |
|---|
| 0 6 | all motors driving baskets counter-clockwise |
|---|
| 0 7 | all motors continue driving baskets counter-clockwise, having just passed SAFETY |
|---|
| 0 8 | all motors continue driving baskets counter-clockwise, having just passed TDC |
|---|
| 0 9 | all motors off, baskets coasting counter-clockwise having just passed switch CCWLS |
|---|
| 0 A | all motors remain off for a period controlled by COAST timer; baskets coast counter-clockwise |
|---|
| 0 B | half of motors drive baskets clockwise; other half on after delay in HALFM |
|---|
| From state 0B, machine returns to state 00 as necessary to complete desired rotations. |
| Transfer Sequence |
|---|
| 0 C | tunnel is committed to transfer; all motors drive baskets clockwise, having just passed CWLS |
|---|
| 0 D | all motors drive baskets clockwise, having just passed TDC |
|---|
| 0 E | all motors off, baskets coasting clockwise, having just passed TDC |
|---|
| 0 F | all motors remain off for a period controlled by machine timer COAST; baskets continue coasting clockwise |
|---|
| 1 0 | all motors on, driving baskets counter-clockwise for a period determined by BRAKE to stop cylinder coasting |
|---|
| 1 1 | all motors off for period controlled by PAUSE; baskets at rest |
|---|
| From state 11, machine returns to state 08 to resume reversals. See explanation on resuming reversals, below. |
| Start-up or Restart Sequence |
|---|
| 1 2 | all motors off; controller waiting for operator to correct error message |
|---|
| 1 3 | the start command is entered at this instant |
|---|
| From state 14, machine returns to state 09. |
Supplement 1
Resuming Reversals after Transferring
After transferring goods from one module to the next, the machine resumes reversals from state
08. This is a valid action even though the motors start when the baskets are between the safety
(SAFETY) and the top dead center (TDC) proximity switches. This action is valid because the
TDC switch was the last switch seen by the controller, thus the TDC switch is ignored when the
controller should detect it this time. Instead, the controller is looking for the counter-clockwise
(CCWLS) proximity switch.
2. Testing Limit Switches
Use the information below and the tables in this document to test the proximity switches.
- Turn tunnel power OFF at the Mentor controller, but leave console power ON.
WARNING: Entangle and Crush Hazards—Guards, covers, and panels—Operating the machine with any guard, cover, or panel removed exposes moving components.
- Do not service the machine with power on except when explicitly called for in the service instructions. Use extreme care when working near moving components.
- Do not attempt unauthorized servicing, repairs, or modification.
- Know the location of the main machine disconnect and use it in an emergency to remove all electric power from the machine.
- The LED light on a properly functioning limit switch will illuminate when a piece of steel is held near the end of the limit switch opposite the lead wire, and extinguish when the metal target is moved away. If the LED does not illuminate when the metal is near, the limit switch may be faulty, or faulty wiring is not allowing power to the switch.
Figure 1: Limit Switch and Target Locations
Tunnels with Individual Modules
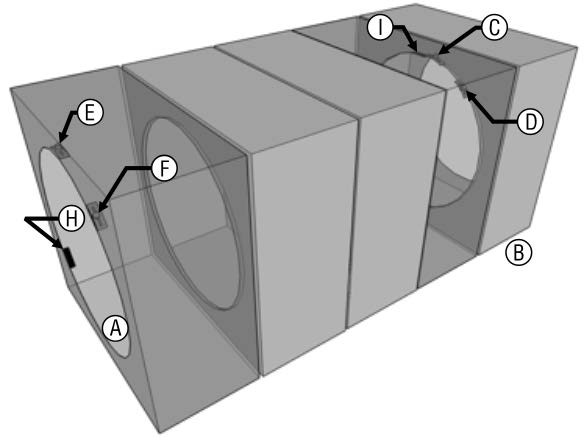 |
Legend
A. Load end of tunnel
B. Discharge end of tunnel
C. Top dead center (TDC) proximity switch
D. Safety (SAFETY) proximity switch
E. Clockwise (CWLS) proximity switch
F. Counter-clockwise (CCWLS) proximity
switch
G. First module or section of tunnel
H. Reversals target (machines with individual
modules only)
I. Transfer target (machines with individual
modules only)
J. Target for all proximity switches (machines
with multi-module sections only) |
|---|
Tunnels with Multi-module Sections
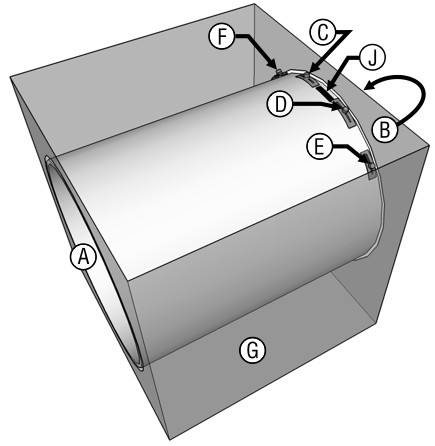 |
|---|
- If the LED on the proximity switch goes off and on as the steel substitute target is removed and replaced near the end of the switch, suspect faulty wiring between the switch and the Mentor console. Test for faulty wiring by opening the Standard and Direct Inputs page from the Inputs and Outputs menu on the Mentor operational display. A green indicator light on the display next to the input name on the Standard and Direct Inputs page indicates that the input is present, while a red indicator light means that the input is not present. For the rotation proximity switches, the display should show a green light when the substitute target is held near the switch. If the light on the proximity switch operates as described in the previous step, but the display indicator does not change from red to green, suspect a loose or imperfect connection in the circuit between the proximity switch and the Mentor console. Use the schematic wiring diagrams to trace and repair the wiring between tunnel modules, between the first tunnel module and the Mentor console, within the console, and on the CPU board.
- If the display indicator is red even when the light on the limit switch is illuminated, there is a short circuit between the limit switch and the Mentor console. Refer to the schematics to troubleshoot this circuit.
- If the limit switch appears to function properly according to the Standard and Direct Inputs page, but the error message still appears when the machine is running, either the switches or targets are out of adjustment or the timers are incorrectly programmed.
- To check for proximity switches or targets out of adjustment, rotate the cylinders clockwise as viewed from the load end by manually turning the interconnecting drive shaft. This procedure may require two or more people. Stop at each point where a target is aligned with a switch.
Figure 2: Cylinder Rotation Diagram
View from Load End
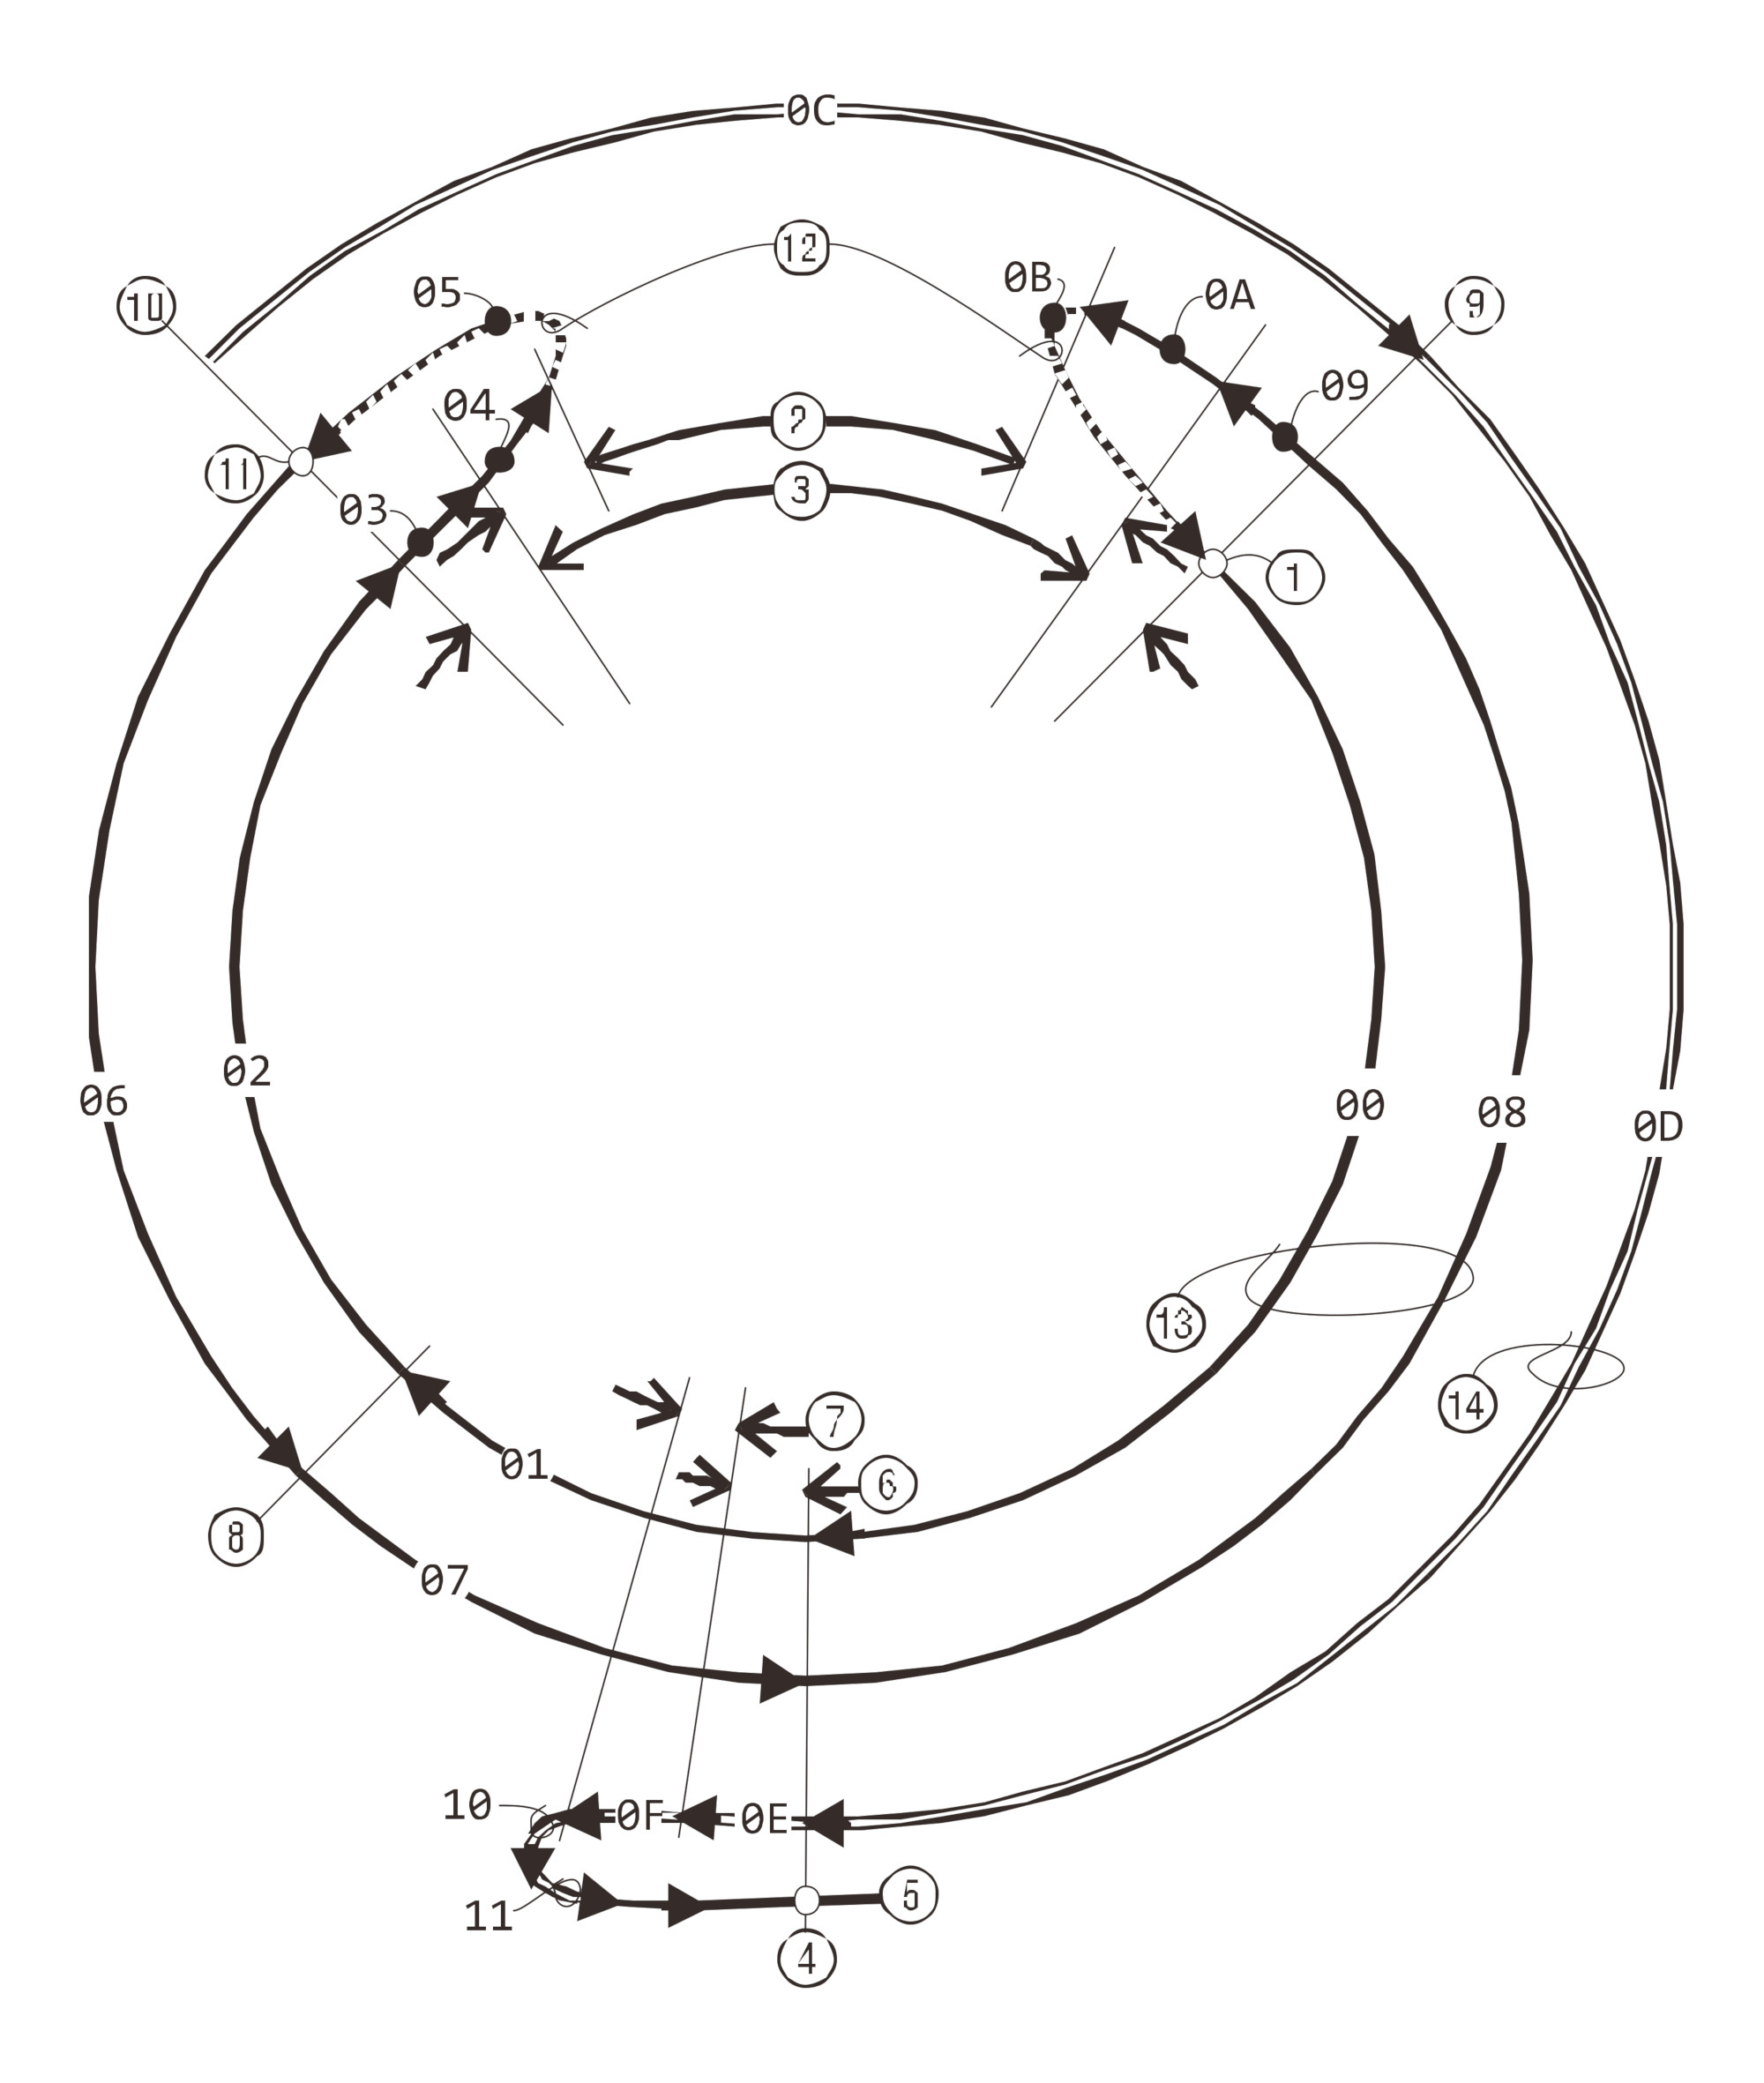
|
Legend
1. Ignores proximity switch
CCWLS
2. Coast timer
3. Internal switching
4. Top dead center proximity
switch (TDC)
5. Ignores proximity switch
TDC and returns to 08
6. Internal switching
7. Coast timer
8. Safety proximity switch
(SAFETY)
9. Counter-clockwise
proximity switch
(CCWLS)
10. Clockwise proximity
switch (CWLS)
11. Ignores proximity switch
CWLS
12. Half-motor timer
(HALFM); indicates that
only one half of the
motors are energized
13. Single line shows reversals
sequence
14. Double line shows transfer
sequence |
- If the LED on a switch does not illuminate, adjust the switch and the target so the switch properly senses the target. Ensure that the target will not strike this or any other limit switch during operation.
CAUTION: Machine Damage Hazards—Proximity switches will likely be destroyed if struck by the steel target.
- When adjusting either the target on any module, ensure that the target will not strike or touch any other proximity switch on that module.
- Use the Output Timers page (Configuration/Operating Parameters/Output Timers) from the Mentor operational display to check the programming of the timers. Compare the values of these timers with the sample values shown in Table 5. The values in the table are not absolute, but will usually provide a good starting point for finer adjustments.
Table 5: Sample Values for Rotation Timers
| Timer Name | Suggested Value or Range |
|---|
| Top dead center to SAFETY | 1.5 seconds |
| Counter-clockwise to top dead center | 6.0 seconds |
| Motor brake at top dead center | 0.3 to 1.0 seconds |
| Half motor start time | 0.5 seconds |
| Clockwise to counter-clockwise | 4.5 to 6.5 seconds |
| Max time to start rotation | 14.0 seconds |
| Pause at top dead center | 4.0 to 5.0 seconds |
| Motor coast before reversal | 1.5 seconds |
| Motor coast (anti-plug) | 1.3 seconds |
- If the limit switch circuits were traced as explained in the earlier steps and no problems were
found, suspect a faulty CPU processor board.

