Order help
When replacing a column order one kit KYSSRC0000. It contains the items that are common to all press models.
You should send an eyebolt and cap with the kit so that you can pick up the rods. The parts for needed for the MP15 & MP 16 are X7 10387 & 17A054A, for the MP1A send parts X7 10587A & 17A122.
Look at the attached Press Column Ref Sht. These are the items that are specific to each press model. For some press models (MP1603, MP1604, and the MP1A50), you will need the measurement from the top of the bottom plate to the bottom of the top plate inside the press structure to determine the right rod, spool, spacer, and tie rod bracket.
A complete rod will then contain the kit and components from the Press Column Ref Sht.
Lastly multiply based on the number of columns that are being replaced.
The instructions below give the preload procedure and pressure values for tensioning the rods. You will need a hydraulic nut to achieve these values. The hydraulic nut is rented under part number KYSSRCHYN1.
The hydraulic nut is actually a hydraulic piston with internal threads that screw onto the end of the rod. A portable hydraulic pump is used to operate the hydraulic nut. The rod is preloaded by use of the hydraulic nut. This effectively tensions the rod. The upper fixed nut is jammed tight to keep tension on the preloaded rod.
Removing the old parts
1. The older rod design needs to be cut out of the press. We normally use an oxy acetylene torch with a number 5 tip. You need at least a bottle of oxy per rod and an appropriate amount of acetylene. The rod is about 6 inches in diameter. And, the rod ends are smaller than the middle. So, you cannot get the rod out unless you take off the top plate. Since we don't want to do that, we cut the middle out of the existing rod so we can lower the top half and raise the bottom half. cut away a 2 foot section of the middle of the rod.
You may also have to cut off the top or bottom nut to free the attached part of the rod. Use all fire safety precautions to handle a lot of flying slag.
Installation of the new spool and rod
1. You will have to open the gap between the plates to insert the new spool and thrust washers. We use a hydraulic jack and a wood 4x4 to spread the upper and lower plates. You need about 1/4" clearance to insert the spool.
2. You need to insert the rod from the top of the press. So, you need a way to hang the rod from the ceiling or forklift or some other hoist mechanism. We have cut a hole in a roof to get the rod high enough for insertion. Plan your way through this before starting the job. You may need choker straps or chain fall or hoist to handle this. The rod weigh about 200 pounds. Be extremely careful not to damage the threads.
3. The relief groove in the nuts goes toward the upper and lower plates.
4. You will use a hydraulic nut to stretch the rods. This is essentially a hollow bore ram with threads to match the nuts on the rod. It comes with the appropriate parts to bridge the top nut and allow tightening of the permanent nut. The threads need to be clean and lubricated before you install the nuts. Fix any thread imperfections before putting the nut on. The permanent nut is hand tightened through the process, so any ding in a thread is bad.
Do not to overextend the hydraulic nut.
There is no internal stop on the hydraulic nut. The seals will blow out if the nut is overextended. There is a line on the nut which shows the limit. Screw the nut on further to limit the piston travel. There is a spare seal in the nut kit in case of a blowout.
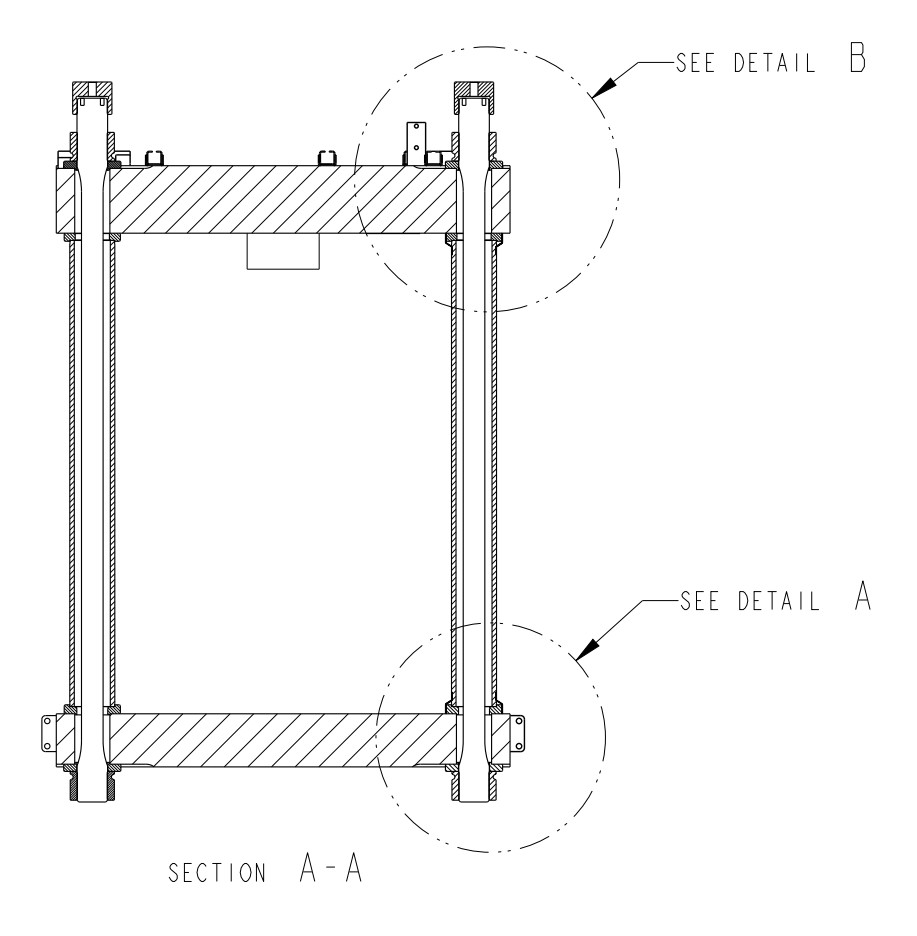
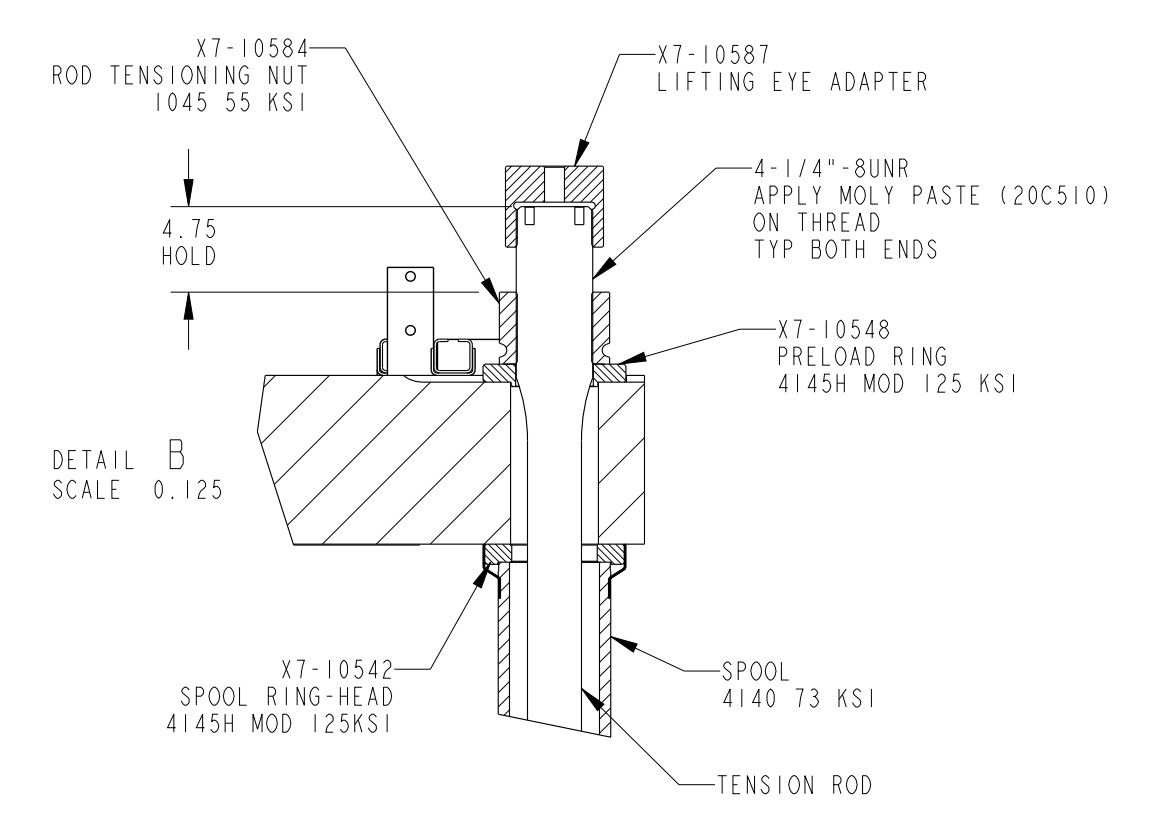
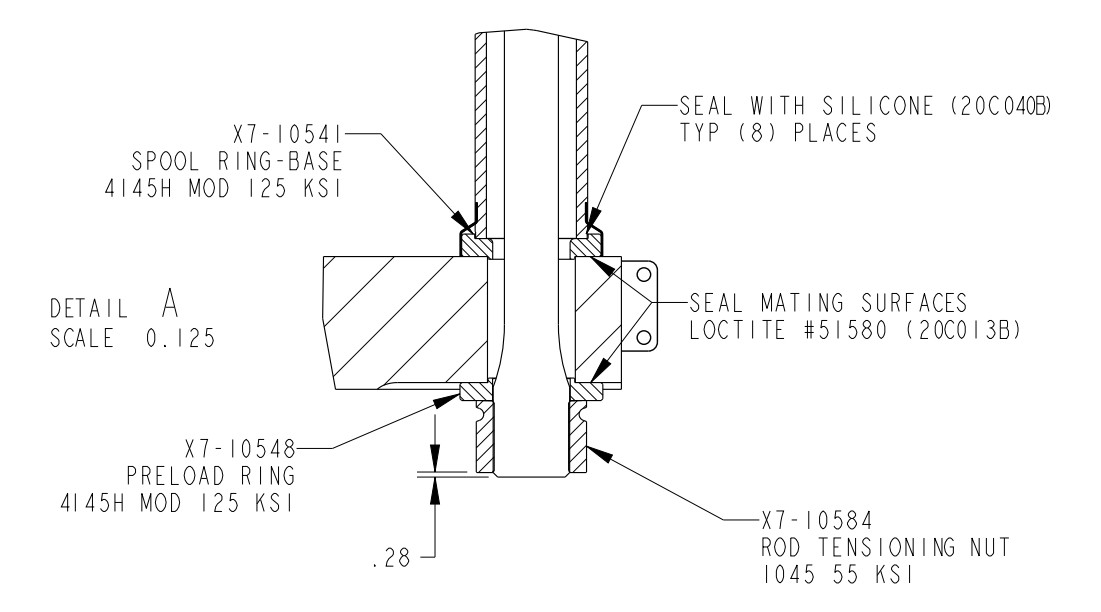
- Install tension rod assembly as shown in detail A & B
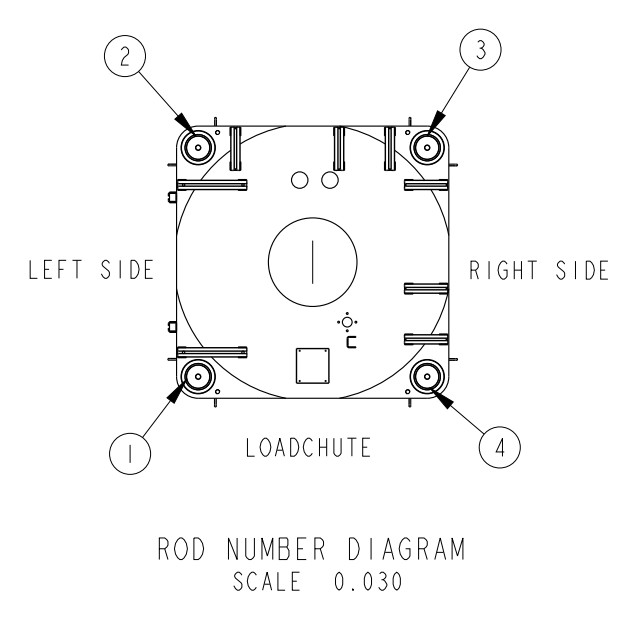
- Assign tension rod number (see rod number diagram)
- Install hydraulic tensioner
- Apply pressure to tensioner based on the model numbers below
MP15**, MP16** - 10,700 psi
MP1A03, MP1A50 - 14,500 psi - Tighten preload nut onto preload ring
- Slowly release pressure from tensioner to 0 psi
- Repeat step 4 - 6 three more times
MP1550
| Rod | Rod Length | Spool | Spool Length | Head Plate | Base Plate | Additional Spacer (QTY) | Tie Rod Bracket |
|---|
| X7 10600A | 94.25 | X7 10546 | 64.75 | 7.50 | 5.50 | | 07 10594A |
MP1556
| Rod | Rod Length | Spool | Spool Length | Head Plate | Base Plate | Additional Spacer (QTY) | Tie Rod Bracket |
|---|
| X7 10642 | 97.75 | X7 10546 | 64.75 | 9.00 | 7.00 | | 07 10594 |
MP1601
| Rod | Rod Length | Spool | Spool Length | Head Plate | Base Plate | Additional Spacer (QTY) | Tie Rod Bracket |
|---|
| X7 10600A | 94.25 | X7 10564 | 63.25 | 7.50 | 5.50 | | 07 10594A |
MP1602
| Rod | Rod Length | Spool | Spool Length | Head Plate | Base Plate | Additional Spacer (QTY) | Tie Rod Bracket |
|---|
| X7 10642 | 97.75 | X7 10564 | 63.25 | 9.00 | 7.00 | X7 10548A (1) | 07 10594B |
MP1603
| Rod | Rod Length | Spool | Spool Length | Head Plate | Base Plate | Additional Spacer (QTY) | Tie Rod Bracket |
|---|
| X7 10600A | 94.25 | X7 10564 | 63.25 | 7.50 | 5.50 | | 07 10594A |
| X7 10600A | 94.25 | X7 10546 | 64.75 | 7.00 | 5.50 | | 07 10594A |
MP1604
| Rod | Rod Length | Spool | Spool Length | Head Plate | Base Plate | Additional Spacer (QTY) | Tie Rod Bracket |
|---|
| X7 10595A | 99.25 | X7 10536 | 66.25 | 9.00 | 7.00 | | 07 10594 |
| X7 10642 | 97.75 | X7 10564 | 63.25 | 9.00 | 7.00 | X7 10548A (1) | 07 10594B |
MP1640
| Rod | Rod Length | Spool | Spool Length | Head Plate | Base Plate | Additional Spacer (QTY) | Tie Rod Bracket |
|---|
| X7 10642 | 97.75 | X7 10546 | 64.75 | 9.00 | 7.00 | | 07 10594 |
MP1650, MP1656
| Rod | Rod Length | Spool | Spool Length | Head Plate | Base Plate | Additional Spacer (QTY) | Tie Rod Bracket |
|---|
| X7 10625 | 101.25 | X7 10536 | 66.25 | 9.00 | 9.00 | | 07 10594 |
MP1A03
| Rod | Rod Length | Spool | Spool Length | Head Plate | Base Plate | Additional Spacer (QTY) | Tie Rod Bracket |
|---|
| X7 10608 | 115.00 | X7 10544 | 78.50 | 9.00 | 7.00 | X7 10548A (2) | 07 10594B |
| X7 10608 | 115.00 | X7 10544 | 78.50 | 9.00 | 9.00 | X7 10548A (1) | 07 10594B |
MP1A50
| Rod | Rod Length | Spool | Spool Length | Head Plate | Base Plate | Additional Spacer (QTY) | Tie Rod Bracket |
|---|
| X7 10608 | 115.00 | X7 10544 | 78.50 | 9.00 | 9.00 | X7 10548A (1) | 07 10594B |
| X7 10608 | 115.00 | X7 10544A | 80.00 | 9.00 | 9.00 | | 07 10594 |
| X7 10122 | 119.00 | X7 10544A | 80.00 | 11.00 | 11.00 | | 07 10594B |
