How to Calibrate the Load Conveyor Scale
This document describes how to configure and calibrate the weighing mechanism of the Milnor® CONWA loading conveyor on Milnor® CBW® systems with the Milnor® Mentor™ version 3.4 and later control systems. The CONWA conveyor uses colored lights to prompt the operator to load batches of goods that are consistent in weight for each wash formula. If the loading conveyor is improperly configured or out of adjustment, wash quality and/or productivity may suffer. In extreme cases, tunnel jams may occur.
Configure Mentor
Configuration of the Mentor® controller tells the computer what types of devices are attached and how the information to and from those devices should be interpreted.
Define the Loading System—
The Mentor® controller uses several screens or pages of information to record what devices are connected to it, along with other functional characteristics. The
Loading tab of the
Hardware page is shown in
Figure 1.
Figure 1: Hardware/Loading Tab (Detail)
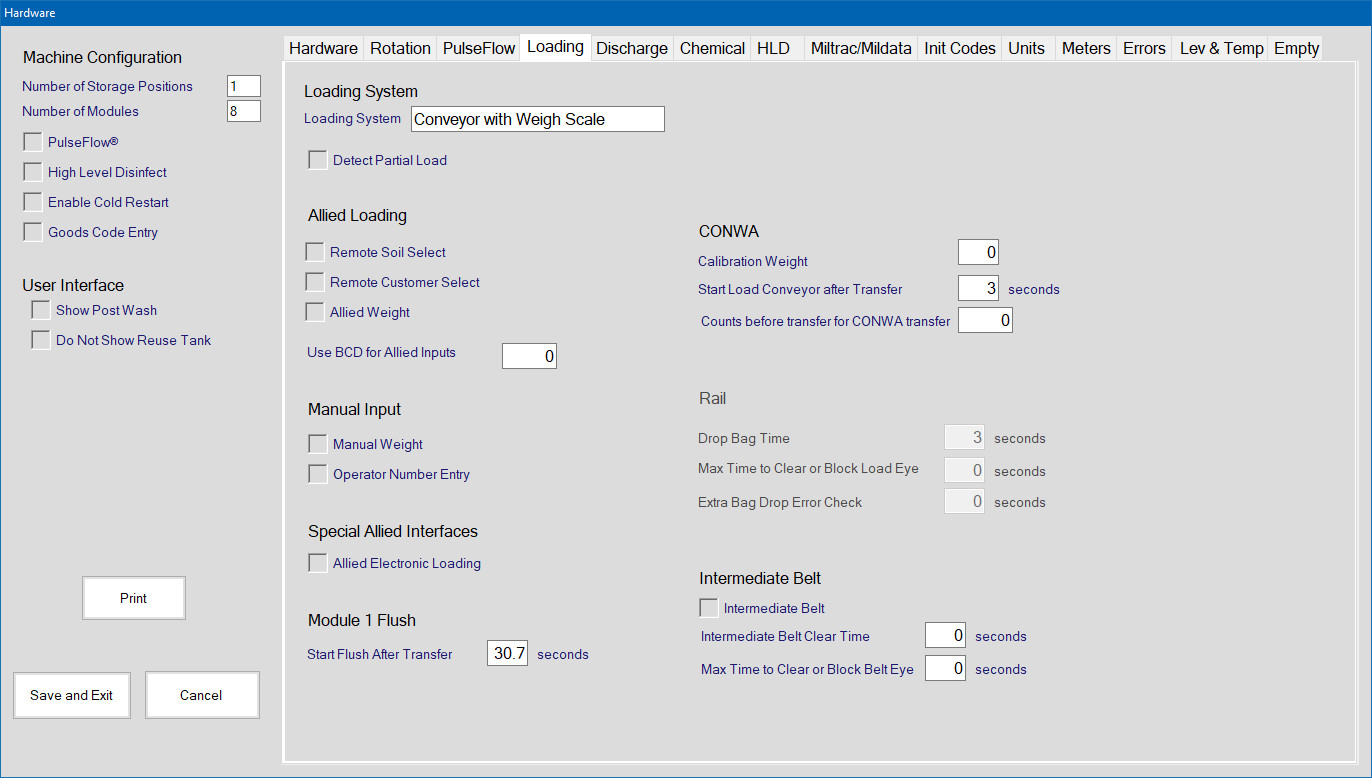
Before proceeding further with these calibration and configuration instructions, verify that the installed CBW® system is configured for a Milnor® CONWA loading conveyor. The most apparent characteristic of a CONWA conveyor is the large bank of four “traffic lights” on the conveyor. These lights are used to direct the operator in loading the device. If these lights are not present, the loading system is probably a Milnor® CONLO loading conveyor—a non-weighing loading conveyor.
After the loading conveyor is verified to be a weighing (CONWA) model, the configuration of the Mentor® controller must be verified to ensure that the correct loading device is designated. Log in to the Mentor® system with programmer rights (see Note 1), then select the Configuration menu. From the Configuration menu, select the Loading tab of the Hardware display page (
Figure 1). The entry in the Loading System field should read Conveyor with Weigh Scale (see item B in
Figure 2).
Note 1: Log in to the Mentor® controller by clicking the
Login button on the
Operational Display. In the box that appears, enter your login name and password. If the login name was previously given programmer rights, the
Configuration and
Programming menus will become available. If these menus do not become available, consult laundry management.
If necessary, change the loading system configuration by clicking the current
Loading System entry. This action will display a list of possible loading devices. Click the desired loading system (
Conveyor with Weigh Scale or Rail System with Weigh Scale), then Clickthe
Select button.
Select
Save and Exit to make the changes permanent and return to the
Operational Display.
Set the Number of Storage Positions—
The Number of Storage Positions field, located near the upper left corner of the Hardware display page, controls how many storage positions are visible on the Mentor™ Operational Display. Count the compartments on the loading conveyor capable of holding goods, then enter the correct number in this field. The last two numeric digits of the machine model number (see machine nameplate) also indicate the number of compartments. For example, a device with a model number of CONWA308 is a weighing conveyor with eight compartments. Valid entries are from 1 to 12, inclusive. The entry of “1” is rarely used with conveyor systems, but is often applied to rail loading systems.
Set the Calibration Weight—
The CONWA weight system uses a relative scaling system. So, when you weigh a known weight we record the feedback and then compare future loads to that feedback to calculate the new load weight.
You set the calibration weight in Hardware configure. We recommend using an actual load of goods at a known weight rather than a smaller object. The exact placement of a smaller weight in the CONWA pocket can change the feedback and thus offset the scale. You want the center of mass of the weight to be where the center of weight of the goods will be when loaded. That's why we say to use a batch of goods.
Figure 2: CONWA Calibration Weight Field
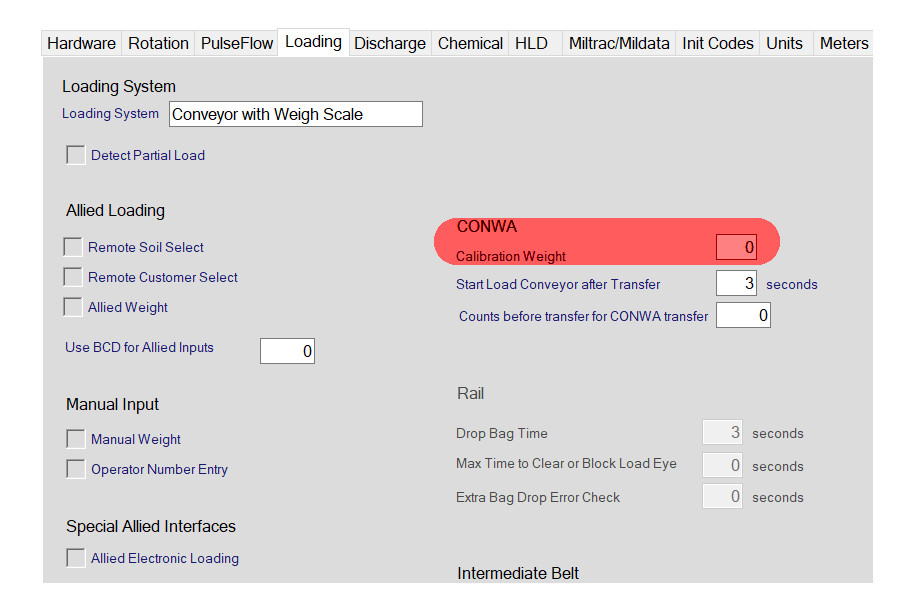
Click the Calibration Weight text box. With the entire number highlighted, enter a new calibration weight.
Click
Save and Exit.
Calibrate Conveyor-to-Mentor Interface
The weighing conveyor sends signals to the Mentor® controller as variations in voltage. Weight applied to the loading conveyor causes the voltage output of the load cell to increase. The weight present in the first compartment of the conveyor is calculated by comparing the voltage from the loaded conveyor to the voltages measured when the conveyor is empty and when it is loaded to a known weight.
For accurate weight calculation, the load cell interface must be adjusted so the voltage produced with an empty conveyor falls within the acceptable range. The Mentor® controller uses a menu system (
Figure 3) to provide an easy method of accomplishing this adjustment, as described below.
Figure 3: Calibrate Scale Menu

- At the Mentor® computer, click the Calibrate Scale button (item 2 in Figure 3). The Calibrate Scale procedure (item 3 in Figure 3) appears.
- In the Mentor® cabinet, locate the weigh scale interface board. This board, shown in Figure 4, is identified by a single amber LED and a small brass potentiometer adjusting screw. This screw adjusts the zero offset to the A/D signal.
Figure 4: Load Cell Interface to Control
| Board | Legend |
|---|
 | 1. Potentiometer adjusting screw |
- Observe the hexadecimal A/D value near the bottom of the Calibrate Scale procedure (see Figure 3) and press gently on the weigh scale. After noting whether counts increase or decrease with pressure, remove all external forces (people, tools, etc.) from the weigh scale.
- If the A/D value increases when pressure is applied to the conveyor, turn the potentiometer adjusting screw so that the value is in the range from C0 to 120 without passing 0. These are hexadecimal numbers.
- If the A/D value decreases when pressure is applied to the conveyor, turn the potentiometer adjusting screw past 0 and continue turning until the range of C0 to 120 is achieved.
- With the A/D value in the appropriate range, the zero offset is correct. If this number is too high the scale will saturate the input and you will have issues with weight when the scale is completely loaded.
Calibrate Scale to Zero
- To provide a true reading of the weight of the empty conveyor, verify that there are no goods in the first storage position and that there are no people or equipment leaning on the conveyor.
- At the Mentor® computer, click the Zero Scale button. Again verify that the first storage position is empty and that no people or objects are click the conveyor.
Calibrate Scale to Calibration Weight
- The final step in calibrating the weigh scale is providing a known weight for comparison to the zero value set in Section Calibrate Scale to Zero.
- Place a weight of the given value in the center of the first storage position. The weight for which the Mentor® controller prompts is the weight entered according to Section Set the Calibration Weight.
- When the desired weight is properly placed in the first storage position, click the Calibrate Scale button shown in Figure 3.
- Click the Done button to save the values and close the window.
Scale A/D Limitation
It should be noted that after calibrating the scale to zero, the weight data from the goods can only be processed up to approximately 1500 lbs. Here, the A/D value reading reaches its maximum value in the range, at which it becomes "saturated" and would stop reading any additional weight data input from the load scale. If this is the case, the potentiometer adjustment is set too high. Readjust and calibrate again.
